A guide of step-by-step instructions for how to set up your user account based on PelEX’s recommendations
Last updated January 9, 2025
A PelEX user account provides individuals of participating organizations access to PelEX’s Power BI Reports. Power BI is a platform by Microsoft, which requires users to set up new Microsoft accounts provided by PelEX.
Each participating organization is allowed six (6) complimentary user licenses to Microsoft Power BI. Organizations with more than six user accounts are subject to additional fees. An individual who wishes to request a user account must be approved by their administrator. PelEX may also confirm with administrators for user account requests.
1. Complete the PelEX User Request Form
To request a new user account, please complete the User Account Request Form. The form will ask you to provide the following information:
- Organization
- First and last name
- Work email address
- Phone number (required by Microsoft to create the account; will not be used by the PelEX team)
- We recommend using your cell phone or another phone that you have consistent access to
- Select the report(s) you’d like access
- Select your email alert preferences
- Email alerts include summary statistics from your report and a convenient link to the Power BI login page
Once the PelEX team begins processing your request, you will receive an email from pelexhie_admin@lphi.org confirming your submission with further instructions and resource links.
2. Register your Microsoft Office 365 Account
Once the PelEX team has created your user account, you will receive an encrypted email from us to your work email address. The encrypted email includes a PDF attachment with your PelEX Microsoft Power BI username and temporary password and a link to log in for the first time.
If you do not see the email, check your Spam folder and ensure it has the correct sender address and subject line to confirm that it is a trusted email. If you do not receive an email, contact us at support@pelexhie.org and we can re-send the email upon request.
- Visit the Microsoft Power BI/Fabric (app.powerbi.com) homepage or the Office 365 home page (https://www.microsoft365.com/). If you are automatically logged into an existing account, it’s easiest to log out and start fresh.
- Sign in using the provided PelEX username and password. Please do not copy and paste the temporary password.
- You should now be prompted to change your password to your preference and set up two-factor authentication.
3. Set up Two-Factor Authentication
All users will be required to set up two-factor authentication, which prompts users to verify their identity before they can log in to their account. Users can choose from 3 options for how Microsoft can contact you to confirm your identity for two-factor authentication. If you require additional assistance, watch this brief Microsoft tutorial on setting up two-factor authentication.
NOTE: The option you select here will remain as your preferred contact option moving forward so, please ensure that you pick the right option for you. Users will be prompted to complete two-factor authentication every 7 days.
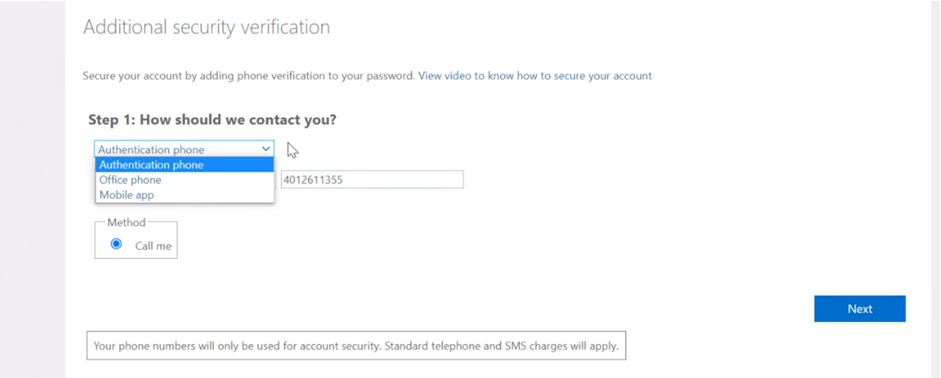
We do not recommend selecting “Office phone,” since those require inputting an extension and office phones can change more frequently and may require additional assistance from office management.
“Authentication phone” implications:
| Pros | Cons |
| You will receive an automated phone call from Microsoft, and you will be instructed to press a certain button on the keypad to verify your identity. | These options are very easy to setup initially, but some may find the phone call disruptive on an ongoing basis. |
If you choose “Authentication phone,” Microsoft will call your phone and prompt you to press # to verify yourself.
“Mobile app” implications:
| Pros | Cons |
| You will receive an alert on your cell phone prompting you to either click a button or enter a code to verify your identity. | This option requires you to download the Microsoft Authenticator app, which may be more effort for the initial setup, but most users find this option to be the easiest on an ongoing basis. |
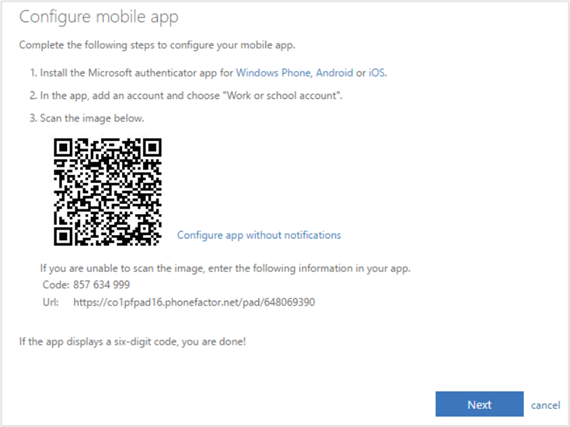
If you select the “Mobile app” option, you will be given instructions to download the app and set up your account within the app (as pictured below). Once you complete the steps, click “Next.”
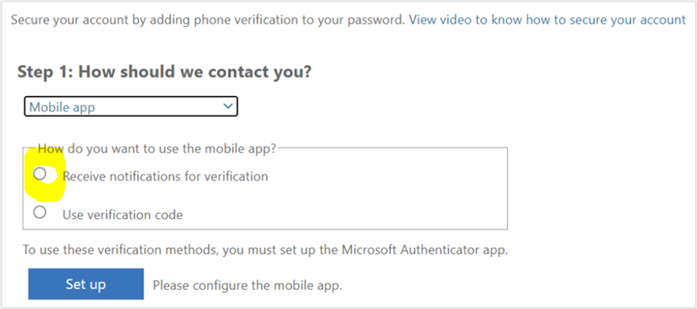
There are two options for how to set up the “Mobile app” verification process (as pictured below). We recommend selecting the first option, which permits you to receive push notifications through your mobile device and simply press a button on your device to verify your identity.
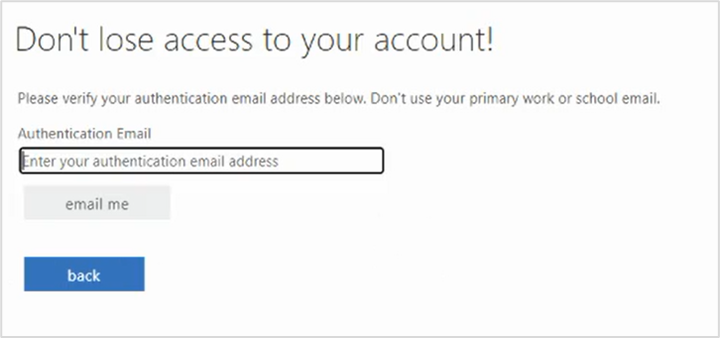
After you’ve verified an additional verification method, Microsoft will prompt you to verify your authentication email. Microsoft recommends not using your primary work or school email. You’ll receive a verification code at this email address.
NOTE: You may be asked to verify your phone another time either via text or call.
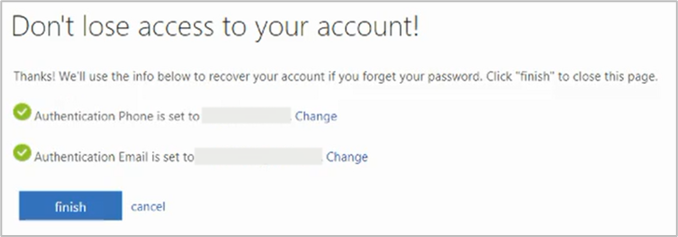
Click “Finish” to complete the two-factor authentication setup.
4. Login into Microsoft Office 365
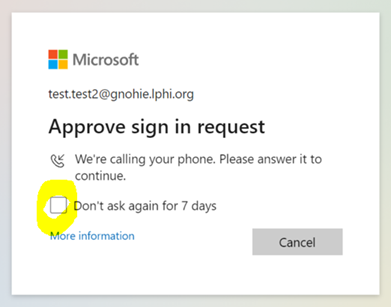
After you complete the two-factor authentication process, Microsoft will allow you to defer the two-factor authentication for the next 7 days (as pictured below). We recommend checking this box to make it easier for you to access PelEX reports on a regular basis.
Note: If you have more than one Microsoft account that you use regularly, we recommend making a separate browser profile using this guide to make it simple to switch between multiple Microsoft accounts.
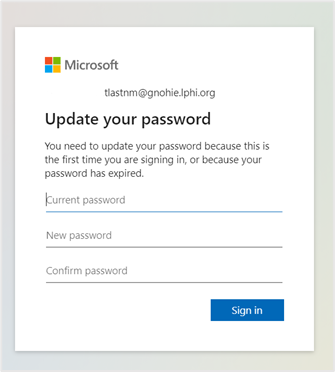
Finally, you will be prompted to create a personalized password for your Power BI account (as pictured below). Click “Sign In.”
Note: After logging in for the first time, there will be a slight delay before you users can access PelEX reports. If you do not have access to the report immediately, try logging out and logging back in a few hours later. That process will work for most users.
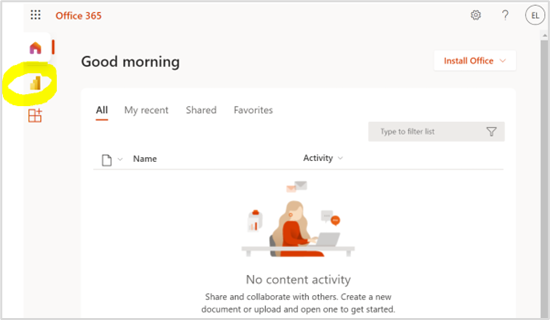
After clicking “Sign In”, you will be automatically directed to the Microsoft Office 365 homepage. You can click on the Power BI icon on the left-hand menu to open the Microsoft Power BI website (as pictured below and circled in yellow). After clicking the icon, you will be directed to the Power BI website.
5. Navigating the Power BI Website
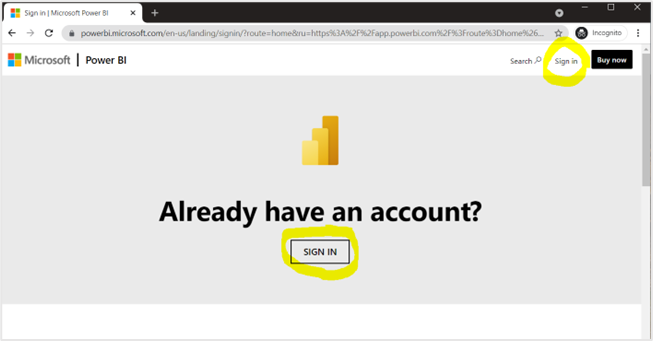
To visit the Power BI website, go to: https://app.powerbi.com/home. Please bookmark the site in your browser so you can easily access it later. If you have not yet logged in, click the sign in button (as pictured below and circled in yellow) and provide your username and password as requested.
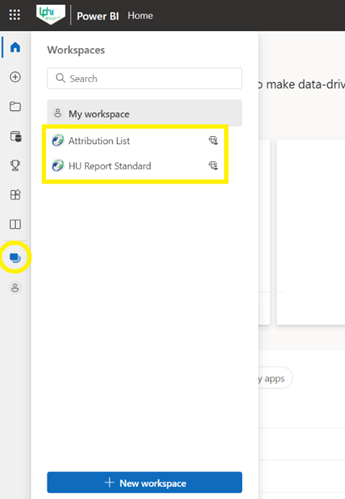
To navigate to the reports,
- Click on the “Workspaces” icon in the left-hand navigation bar (as pictured below). A menu will appear with a list of Workspaces (which are like folders) that you have access to. Depending on which reports your organization has selected.
- Click on the Workspace name to view its contents, which includes the report.
- Click on the name of the report to open it. Its type should be categorized as “Report.”
Note: While users can download the Power BI desktop app for free, daily updates to the HU Report data will not occur through the desktop app. Users must access the HU Report through the Power BI website to view the most up-to-date data.
6. Ongoing Security Requirements
The PelEX team has several ongoing security measures and requirements, described below, to ensure the privacy and security of protected health information contained in the reports. This is in accordance with our Terms & Conditions and User Access Control policy, both of which can be found on our Resources webpage.
- Two-Factor Authentication
- All users will be required to set up two-factor authentication upon logging in for the first time.
- This will prompt users to verify their identity every 7 days or whenever logging in on a new device.
- Detailed instructions and user tips are provided in Section 3 of this user guide.
- Password Update Every 90 Days
- All users will be required to update their password every 90 days.
- When your password is about to expire, you will receive an email from Microsoft informing you of the expiration date and prompting you to update your password.
- Notify PelEX within 7 Days of User Transitions
- Member organizations should promptly inform the PelEX team if a user is leaving your organization or transitioning to a different role that does not require access to reports. Members must notify the PelEX team by contacting support@pelexhie.org or another PelEX staff member within 7 business days of a user’s employment or contract ending.
- The PelEX team will promptly deactivate the user account to prevent unnecessary or unauthorized access to reports.